Upload and Manage Documents Securely in Bear IQ
This article provides detailed instructions on how to securely upload, manage, and share documents within Bear IQ. Sharing and managing documents is crucial for seamless collaboration and data accessibility in Bear IQ. Ensure that you have the necessary permissions to access and make changes to the user documents.
Tip: Remember to always verify file types and sizes for a smooth upload process.
Key Moments to look out for:
Navigating to the User Documents tab
Ensuring successful file upload and visibility
Managing downloaded and deleted files efficiently
Heads Up: Confirm your internet connection is stable to avoid interruptions during the file upload process.
Step-by-Step Instructions
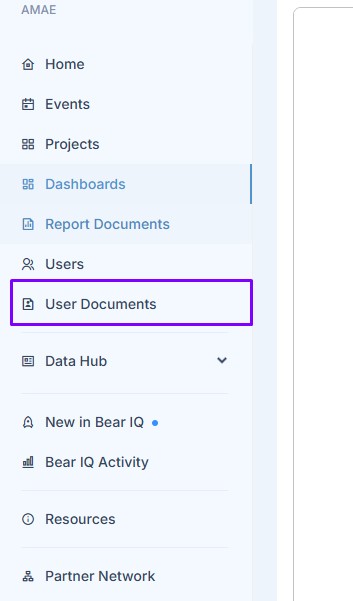
Step 1: Access the User Documents Section
Log into Bear IQ and navigate to the 'User Documents' tab located on the right-hand side of the screen.

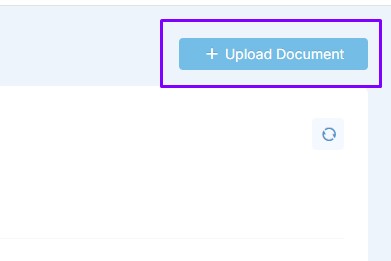
Step 2: Begin the Upload Process
Once in the User Documents section, click on 'Upload Document' at the top left-hand corner.

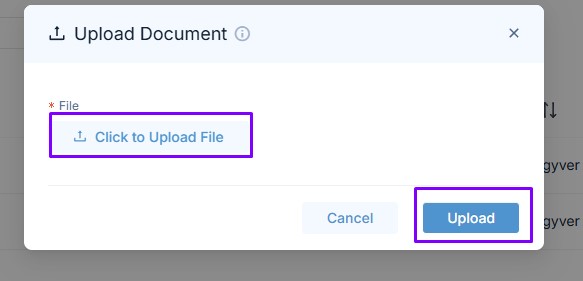
Step 3: Choose the File to Upload
Click on 'Upload File' which will open your File Browser. Select the desired file you wish to upload.
Step 4: Confirm File Upload
Click on the selected file to verify its appearance and then click 'Upload.'

Step 5: Verify File Visibility
The uploaded file should now appear in your user documents list and is accessible to all platform users.

Step 6: Download a File
To download the file, click on the three dots next to the file and choose 'Download.'
Step 7: Delete a File
For deletion, go to the three dots next to the file and click 'Delete.'

If you have any questions or require further assistance, please contact us using the live chat feature.
